
UNIVERSITY OF NEBRASKA
This program is based on a series of exercises developed by Lisa Giannone, PT, from "Active Care", 3019 Geary Blvd SF, CA 94118 415-387-6564
Program notes:
All exercises performed in a pain free range of motion.
Repetitions as noted or as athlete is able
Athlete must be able to do exercises correctly before moving to next level. These exercises are a progression. It is MANDATORY that they be performed in sequence. Athlete WILL NOT be able to perform ALL exercises the first day. That is expected. Start with perhaps first three or four exercises as tolerated. Gradually add exercises as athlete progresses. Cease beginning exercises as athlete progresses to harder, and becomes more efficient. If athlete is NOT able to handle harder exercise that day or any time, ie, looses form, tires too rapidly, or just "can't do it", drop back to lower level. Do NOT skip steps. Exercises are designed not only to strengthen, but to increase/restore "muscle memory" to enhance effectiveness of muscles in question.
Exercises in this phase must be completed with a posterior pelvic tilt and abdominal crunch, as seen in position #1. These positions in this level are the basis of "dynamic stabilization" that is so important to the program.
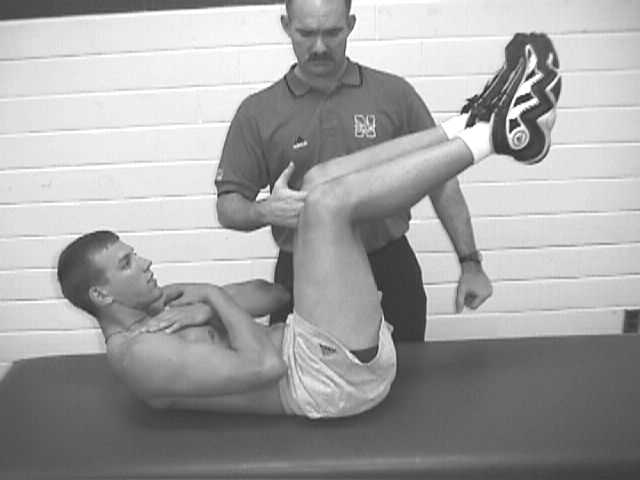
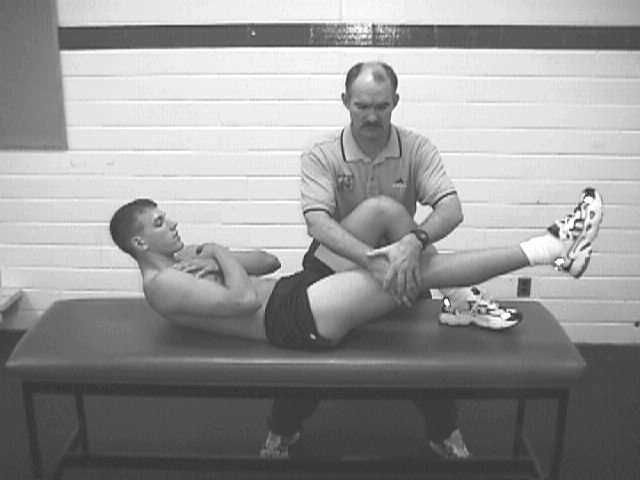
Position #1 Exercise #1 (using position #1)
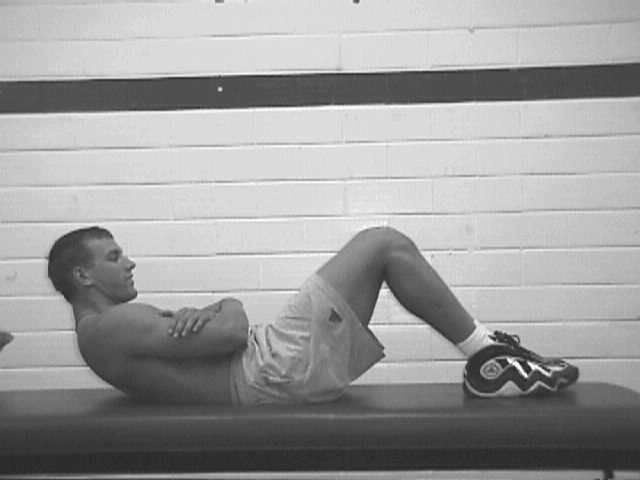

Adductor isometrics in a supine position. Shoulder blades just clear table/floor. Do NOT allow athlete to put hands behind head. Chin just touches chest. A bolster or towel roll may be placed in between knees instead of hands to provide resistance. Tell athlete to "squeeze the knees together and hold the position". Athlete can use weights to keep feet down on table/floor. Watch for substitution.
Perform exercise for 30 seconds or to fatigue.
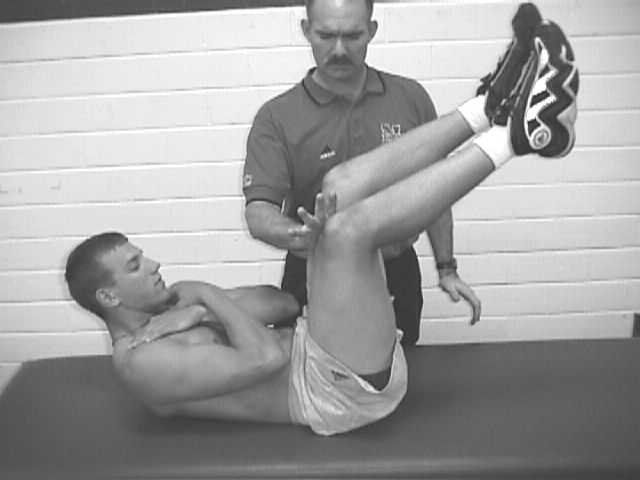
Exercise #2 (using position #1)

Adduction concentric and eccentric contractions
Smooth transitions
Perform 10 reps or to fatigue/discomfort. Tell athlete to "make me work to push you down, then squeeze knees together again". Athlete may eventually be able to do for 30 seconds or 20 reps. Trainer PT can increase resistance, reps etc as tolerated. Use this tip as a guide to advance while performing all exercises.
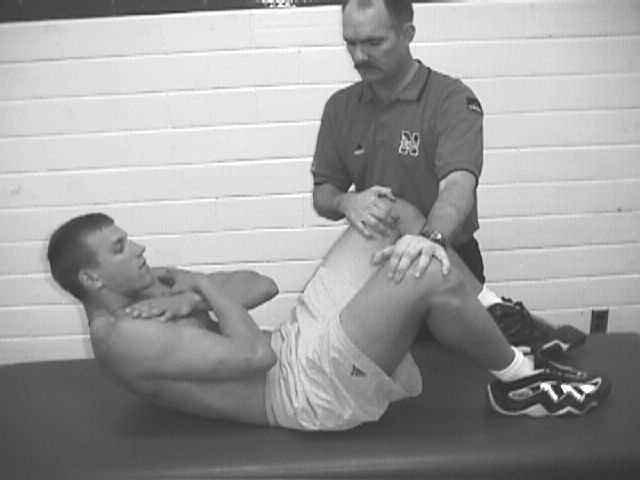
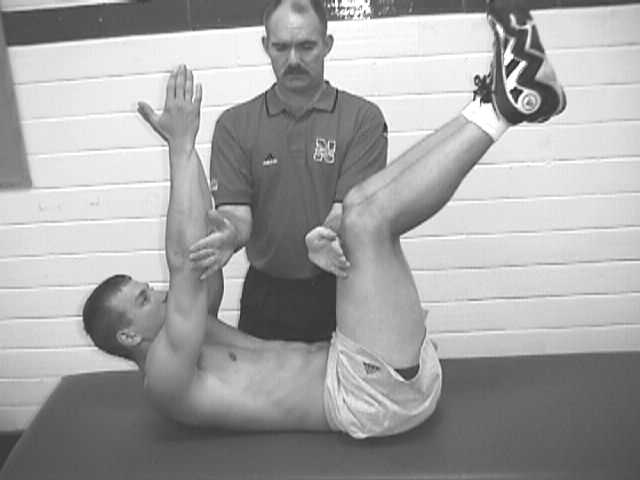
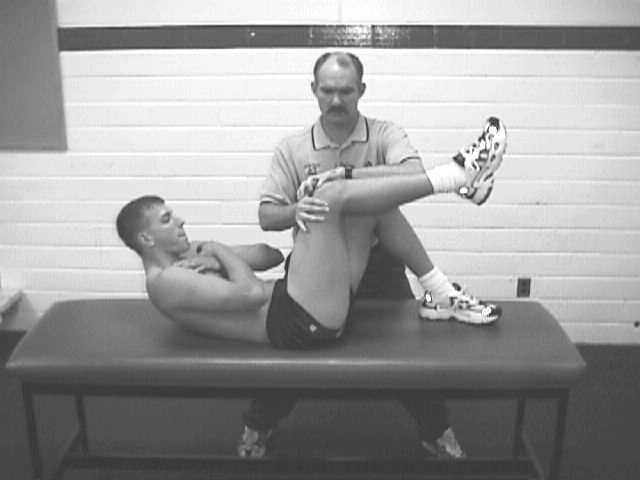
Position #2
Supine position with hips at 90 degrees, knees at a little less than 90 degrees.
Abdominals to curl buttocks off the table. Tell athlete to "hold this position" . Watch for feet dropping or hips dropping below 90 degrees!!
Exercise #3 (using position #2)

Provide resistance to movement at the knees. Tell athlete "don't let me push your knees down!" Eventually s/he will be able to lift upper back completely off table, by holding hip flexion at 90. Watch for feet dropping.
Perform for 30 sec. or to fatigue/discomfort.
Exercise #4
Same positioning as position #2, Add Adductor isometric resistance to exercise.
A bolster or towel roll may be placed in between
knees instead of hands to provide resistance. Tell athlete "squeeze and hold the position!!" They'll get the idea by now. Don't let knees/feet drop!!
Perform 30 seconds or to what athlete can handle.
Exercise #5
Same positioning as position #2, perform resistance to one leg at a time. Tell athlete "don't let me move you!!"
Perform 10 reps or to what athlete can handle.
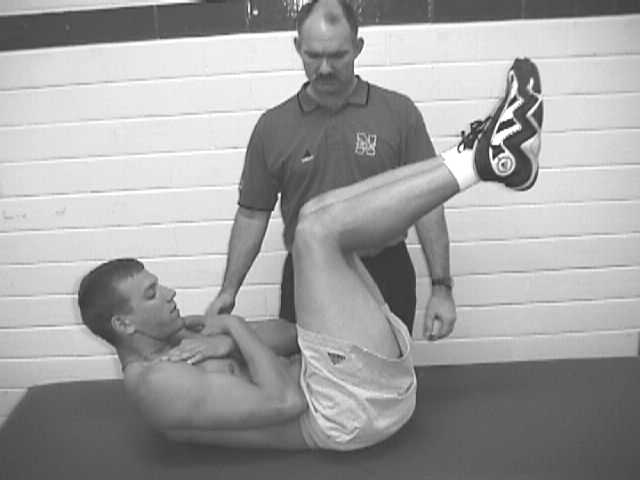
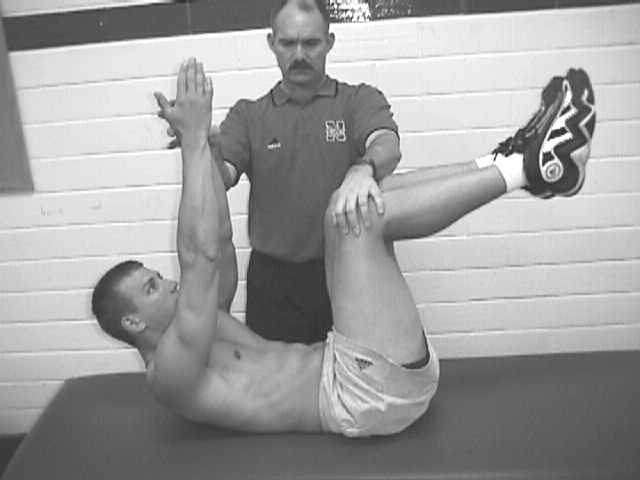
Position #3
Exercise #6
Same leg position as position #2, but hold arms straight up towards ceiling. Put palms together like in prayer. Upper shoulders and buttocks off table/floor. Knees and hands MUST point to ceiling!
While athlete reaches arms & legs towards the ceiling, trainer/PT tries to separate arms and legs with an increasingly more difficult force. Do NOT attempt full force at first!!!!!! Start gradually, then slowly increase force. Tell athlete "Hold! DON'T let me move you!!" At first, athlete will not be able to hold more than 10 seconds at best. As s/he becomes more efficient, they may last more than a minute. Don't loose form, and take my advice by applying force as high up on the knees and arms as you can!!!. (feel the burn? Not the athlete, YOU!!)
Start at 10 sec; advance to 1 min.
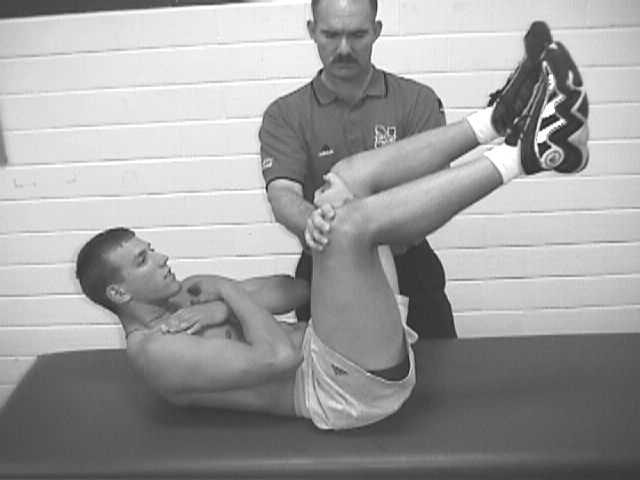
Exercise #7
Same positioning as position #3, provide resistance to opposite arm & leg in a diagonal direction. To athlete" Don't let me move you!!"
Perform 10 sec. each side; 10 reps each side or to what athlete can handle.

Position #4
Exercise #8
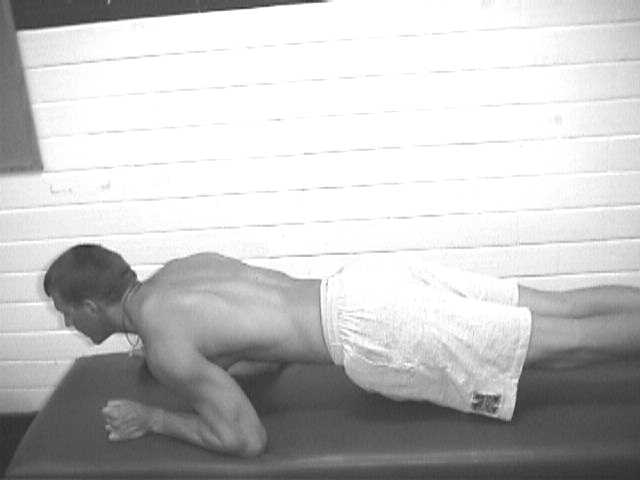
In a push-up position on toes; elbows with arms at sides.
Perform a partial push-up on elbows with extra serratus press. Keep "functional position-ie, neutral spine. Do NOT let the sag or arch the back.
Lower pelvis as close to the table just short of the painful range, repeat to fatigue.To athlete " Push up-repeat. Don't loose your form!"
Perform 30 reps or to what athlete can handle.
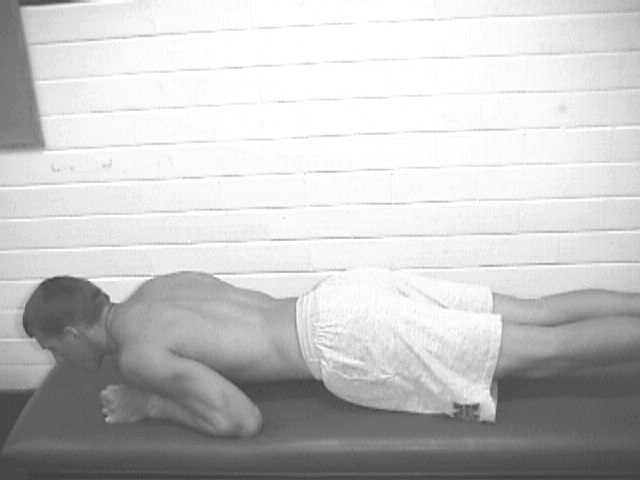
Exercise #9
Same positions as position #4, except, provide resistance over buttocks.
Perform 10 reps or to what athlete can handle.
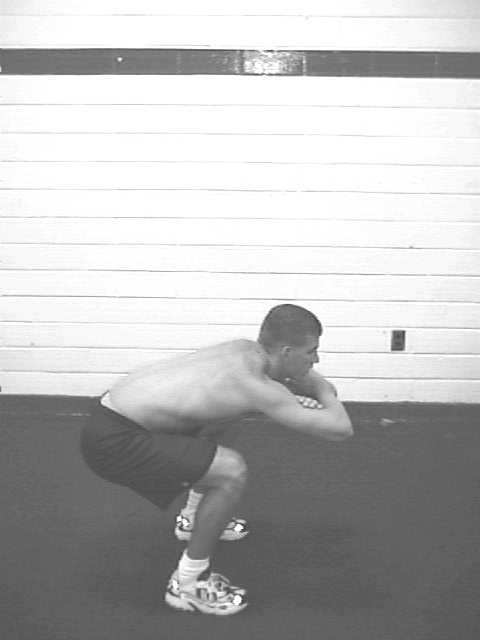
Isometric squats with body weight only. (2 sets of 1 cycle each.)
1 cycle = 40 second hold followed by 20 repeated controlled squats, maintaining back and arm position. To athlete "Keep your head up! Don't loose form!"
Provide enough rest time for a full recovery.
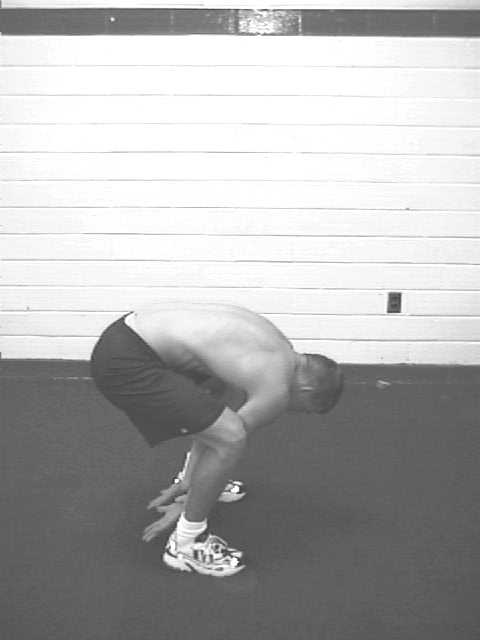
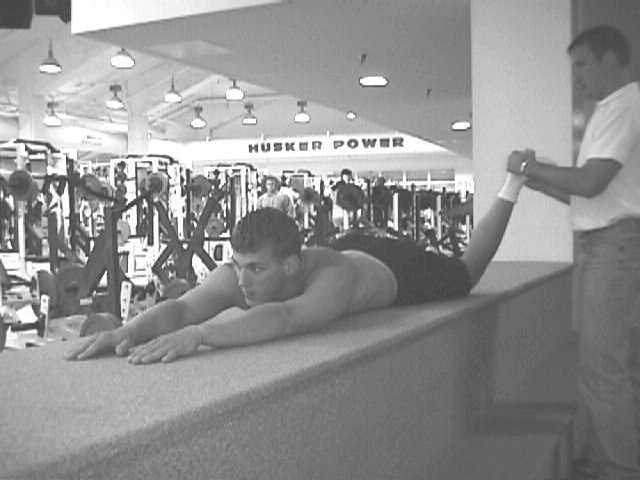
Exercise #1
Position #1
Slight trunk tilt with arms folded out in front.
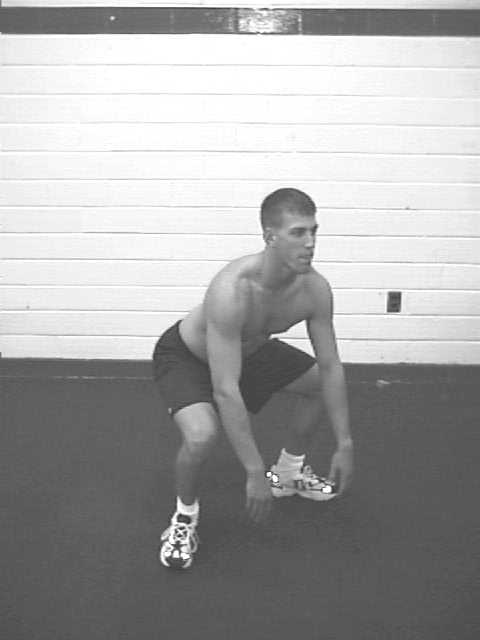
Position #2
Flat back with arms extended between legs.
Reaching back between legs as far as possible.
To athlete, "Reach backwards-Hold!!Don�t touch or rest hands on the floor!."
Exercise #2
Closed hip to open hip squats.
Perform 10 repetitions in each direction.
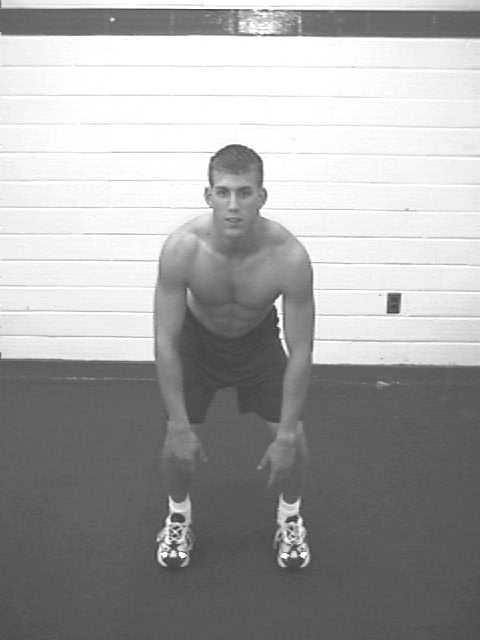
Position #1
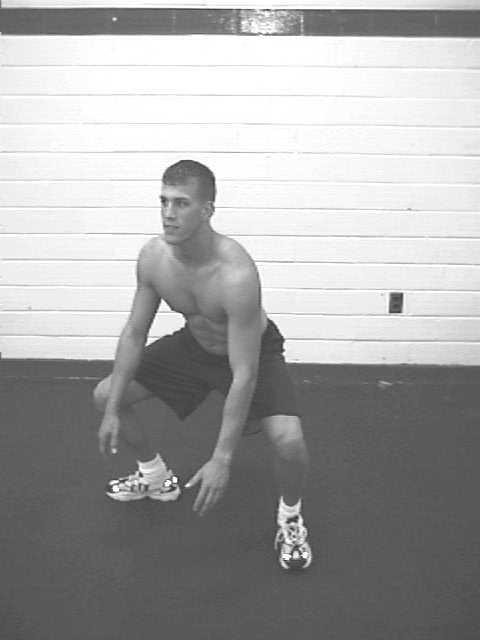
Position #1a
Position #1b
This exercise is performed by moving at a 90 degree angle to the right from position #1 to #1a, and then back to position #1. Then moving at a 90 degree angle to the left from position #1 to #1b, and then back to position #1. To athlete-"Squat, step with left/right foot 90 degrees-now return. Don't loose form!"
Variations :
These exercises are not shown for reasons of brevity. We use a Cybex Multi-hip machine. Make sure you adequately explain the exercise to your athlete. Do NOT allow muscle substitutions! This is one of the biggest problems with these machines, the athlete will CHEAT and not even know it. We don't add these exercises until we are SURE the athlete can do them correctly and WITHOUT substitutions.
Start multi hip standing on involved leg. Do all series of positions first standing on uninvolved side. Your athlete will tell you "its my other side!! Explain why he needs to stabilize while the other side is working. Do NOT advance to involved side until athlete can properly stabilize using injured side while other side is exercising.
Position #1
Hip extension against resistance.
Perform 2 sets of 15 repetitions.
Position #2
Hip flexion against resistance.
Perform 2 sets of 15 repetitions.
Position #3
Hip abduction against resistance.
Perform 2 sets of 15 repetitions.
Position #4
Hip adduction against resistance.
Perform 2 sets of 15 repetitions.
Exercise #1
Abdominal crunches performed in all directions.
There are no pictures for this exercise, these exercises should be done according to Athletic Trainer or Physical Therapist in charge of athlete. Start gradually, make sure athlete is not substituting
Note: Abdominal exercises can be performed many ways, and thus it is up to administrator to determine which exercise shall be done.
Exercise #2
Manual Resistance Exercises
These exercises are performed in a supine position with non-exercised knee bent. They MUST BE ABLE TO HOLD THIS POSITION WHILE EXERCISING!!
Exercise #2a
Hip flexion against manual resistance with uninvolved leg bent. Concentrically and eccentrically. To athlete-" Make me work to push you down (eccentrics). Now pull up to your nose" (concentrics)
Perform 2 sets of 15 repetitions.
Exercise #2b
Hip abduction against manual resistance. Concentrically and eccentrically. To athlete-"move your leg out; hold postion! Now, make me work to move you back to start!" (eccentrics)
Perform 2 sets of 15 repetitions.
Exercise #2c

Hip adduction against manual resistance. Concentrically and eccentrically. To athlete- "squeeze in (concentric)-now make me work to move you back" (eccentrics)
Perform 2 sets of 15 repetitions.
Exercise #2d
Lower abdominal
No picture available. This exercise is performed according to requirements of trainer/PT.
Exercise #2e
Upper abdominal
No picture available. This exercise is performed according to requirements of trainer/PT.
The following exercises are performed in a prone position. Functional spine, ie, neutral position. Do not allow spine to arch!! To athlete- "pull in!
Exercise #3a
Hip internal rotation.
Perform 2 sets of 15 repetitions with each leg.
Exercise #3b
Hip external rotation.
Perform 2 sets of 15 repetitions with each leg. To athlete- "push against me!"
Progressions:
Increased repetitions
Increased resistance, add eccentrics as above.
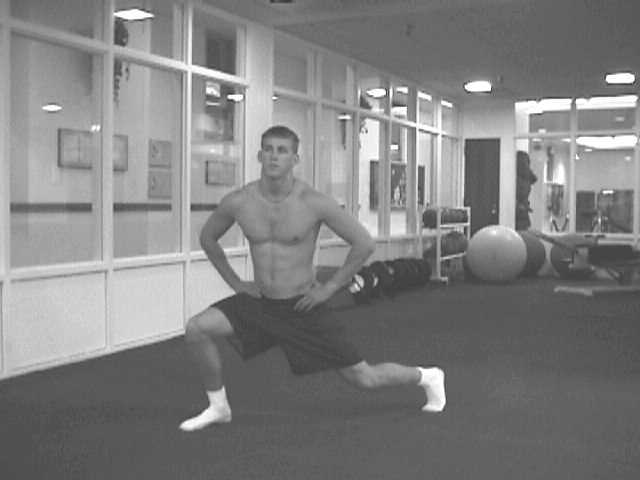
Exercise #1
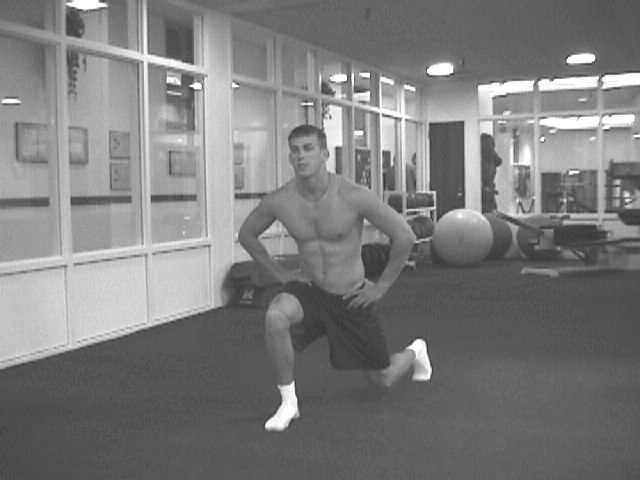
Forward lunges
Perform 20 repetitions with each leg. To athlete-"lunge forward-keep position, do NOT make it hurt!"
Exercise #2
Diagonal lunges maintaining upper body facing forward. To athlete-"Lunge to left/right, while keeping body facing forward" Trainer/PT my need to demo this one.
Perform 20 repetitions with each leg.
Exercise #3
Position #1
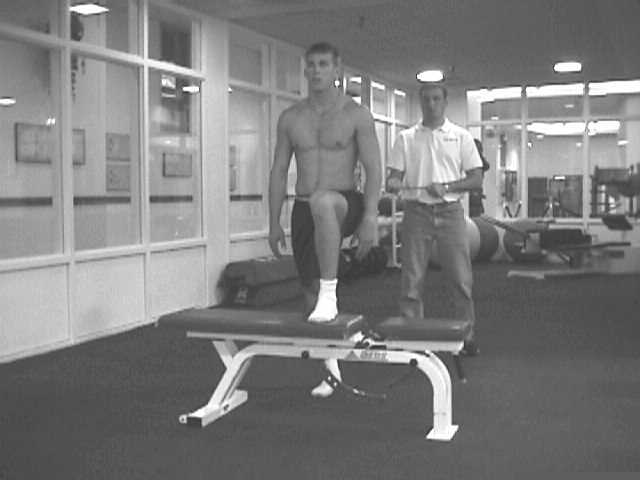
Resistance from behind using resistance tubing. Have athlete step up on bench, stool, whatever, about knee-high. Start with uninjured side first. Step up, full weight on bench/stool, Opposite knee "high step" almost like a 1/2 hurdle. To athlete " Step UP and DRIVE with opposite knee." Make sure athlete can stabilize on injured side before advancing!! The tubing makes it quite tricky. Be safe, start slowly, then gradually advance resistance. This exercise forces athlete to stabilize while being challenged. NB- Do NOT hold tubing in a way that will put you at risk for injury from "snapped" tubing if it breaks!! (been there-done that)
Perform 30 repetitions with each leg.
Exercise #4
Resistance from the side using resistance tubing. Again, these exercises are difficult with tubing resistance because of a challenge to balance. Do NOT start too aggressively.
Perform side steps in squat position with an isometric hold of 5 seconds. Hands placed behind neck. Step to "open up" squat to right/left. To athlete- "squat-now hold position as you step to right/left. Don't loose form!" Perform 10 repetitions in each direction.
Exercise #5
Resistance from the front using resistance tubing. Hands behind back.
Perform a step back and to the side to an open hip and squat position. To athlete- "Squat, hold, step back and to the right/left. Hold position!"
Perform 10 repetitions in each direction with a 5 second hold.
Phase V- Work in Functional Ranges
Phase V consists of Pool work. The idea is to get into more functional activities with the benefits of the water, ie, bouyancy and resistance. Pictures are not shown in this phase do to the simplicity of the exercises being performed. If questions arise about what the exercise should look like, most rehabilitation or exercise manuals can be a good reference. NB: Most pools have a rough surface that may cause blistering of feet. Feet should NOT slip, but pool work out shoes or cheap CLEAN sneakers can be worn.
Exercise #1
Running in pool: three types of running exercises are used.
Exercise #2
Lateral running: four types of lateral running exercises are used.
Exercise #3
Backwards running: three types of backwards running exercises are used.
Exercise #4
Exercises in poolStanding hamstring curls with hands on the wall. Performed one leg at a time, 20 seconds each leg.
Exercise #5
Standing knee extensions with back against the wall. Performed one leg at a time, 20 seconds each leg.
Exercise #6
Internal and external rotations. Performed one leg at a time, 20 seconds each leg.
Exercise #7
Hip adduction/abduction. Performed one leg at a time, 20 seconds each leg.
Exercise #8
Hip circumduction, clockwise and counter clockwise. Performed one leg at a time, 20 seconds each leg.
Exercise #9
High knee running with hands against the wall. Performed for 20 seconds.
Exercise #10
Soccer kicks. Performed one leg at a time, 20 seconds each leg.
Exercise #11
One legged "running" with opposite foot on the floor. Performed for 20 seconds each leg.
Phase VI consists of running, cutting, and agility work on the court or on the field.
These drills should be sport specific. By now, there should be NO PAIN with these activities, and athlete should be comfortable doing any exercise you may use. Be creative. Allow athlete to utilize exercises that mimic or copy sport-specific motions. Do NOT progress too fast! If athlete experiences pain, back off. Make sure s/he is not loosing form.
Please remember that these suggestions are for very high level athletes. These are not necessarily suggested as guidelines or a "cookbook" approach to a rehabilitation for Osteitis. Your orthopedic surgeon, your therapist or your trainer should monitor all advances and changes in the program.